
If you are going to celebrate the craftsmanship and beauty of a timber frame truss, why just have it ornamental? We are going to provide you with ideas to incorporate a true structural timber frame truss into the great room or any other area of your project. As builders and carpenters, we know why most of the time the choice is to have ornamental trusses hung from a 2x ceiling during trim stage. We are going to take a deep dive into this subject. Joined timber trusses are honest and strong frame works. They should be respected as such. We will cover why ornamental trusses are a poor decision and how to incorporate a structural truss instead. All the while, not making a painstaking fuss over order of construction operations.
At the end of the article, you will have a clear understanding and approach to more affordable and honest structural timber trusses. You will be able to say, “Yes, those are holding up our roof.” to your admiring guests.
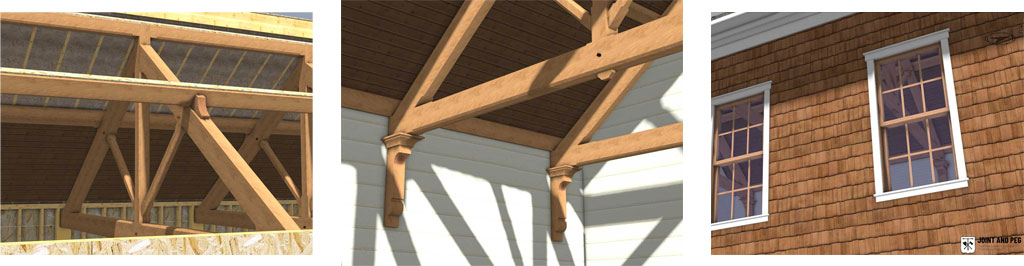
All images, the work pictured in them (yes, even the hanging furniture), and the designs in this article are works of M. Fountain of Joint and Peg. Copyright 2023
Why ornamental timber trusses are a poor choice compared to structural trusses.
Us timber framers and builders sometimes refer to ornamental trusses with the following unflattering terms. “Trimber” Framing, Hanging Furniture, and Ship in a bottle work are three of the more ubiquitous terms for building timber trusses hung from 2x blocking on a ceiling. Typically, these scenarios are when a conventional wood frame is being built and the home has a vaulted great room where trusses would fill out the space nicely. Rightly so, many folks appreciate the beauty of timber trusses in their vaulted ceilings. Let’s go over why this is a bad idea.
Decorative vaulted ceiling beams are a waste of resources.
When a “trimber” frame truss is applied to a ceiling it is doing nothing structurally, other than putting a load on the roof. Although we appreciate and understand beauty for beauty’s sake, when it comes to the art form of a timber truss, we do not follow doing “ship in a bottle’ work. Save the wood and your money for other places in the house. If you want to have timber trusses in your home, do just that, and make them actual trusses that support the roof. However, we do tend to make exceptions for corbels that are placed on the wall in certain circumstances if the trusses are doing the work!
Timber trusses are heavy.

Timbers are heavy on their own, even more so when they comprise an entire truss spanning 18’, 20’, and more. Most timbers primary members on trusses are usually 6” Wide or 8” Wide. Let’s assume we have a modest vaulted room width of 20’.
Here on the left is our king post truss (that we happen to admire deeply (simple, beautiful). It has a 20-foot clear span and is comprised of 6×8 Chords, 6×6 King Post, and 4×4 Struts. Its amount of volume, in board/feet, is equal to just over 200 bd/ft. It is a smaller truss too. Depending on the wood choice it could weight close to 800lbs or more.
Now take this weight and suspend it from the 2x roof that is above it. You must trust that the carpenters blocked out between the rafters sufficiently so that the 2x framing can hold the weight of the truss. Furthermore, we have yet to see a set of plans in the field where the engineer even knew that there was even a suspended truss in the plan. Common sense tells us that 2x rafters shouldn’t support the truss, but rather the truss should support the rafters!
Why rely on fasteners to hold a truss to the ceiling?
This is a lot of weight! Although we have worked along many and a talented carpenter who knew how to do this correctly, we know there are twice as many who do not. There are good structural screws out there including Rothoblass, GRK, Heco, and others that can do remarkable work in securing heavy loads. But they are only as good as the skill of the person who knows where to put them.
Even if the “hanging furniture” truss is installed correctly. Ask yourself why. Why hang a timber truss from a 2x roof and spend your relaxing time under a heavy truss hanging from screws?
Installing heavy timber in a finish room is risky.
Picture this scenario. You have framed your home, dried in, roughed in all your work, and most importantly installed your interior finish on the walls. The finished ceiling is up, otherwise you would not be applying decorative trusses. If the finished ceiling is up, so are your gypsum board walls. The drywall has been taped, mudded and sanded. Maybe even some trim has gone in early. After all that, you now want to bring timber in with the likes of 6×8, 6×10, and 8×10 timbers that most likely have lengths of 20’ to 24’. Did we forget to mention your windows are in?
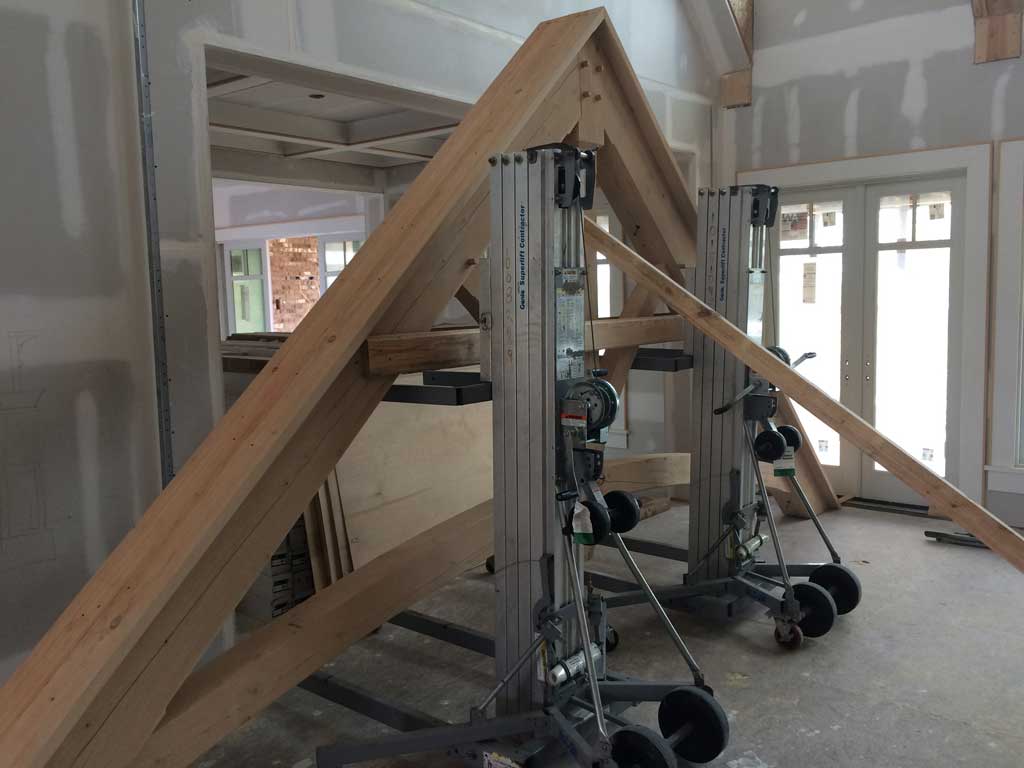
These timbers on their own can weigh 200 to 300 lbs. The timbers have to come in piece by piece. The timbers have to then be assembled into the truss on the floor of the great room. As an aside, if any of you are trying to put these timbers up one at a time, Stop. Once the truss is assembled the crew has to pick the truss up from a level to plumb position. Typically, we would use a material lift to pick the truss up all the way to the ceiling before it is screwed in to the 2x roof! All the while, scratching and marring up the walls in the process.
If the truss is to fit nicely, it must be the same span as the room is wide. Therefore, the marring of the walls. Not to mention, no wall is perfectly true. If this sounds like a pain, it’s because it is! Which bring us to our last reason for not using applied great room ceiling beams and trusses.
Builders and tradespeople know that if something is riskier, it’s naturally and reasonably, more expensive.
“Trimber” frame trusses are more expensive.
Considering the above reasons and that decorative timber frame trusses are more laborious and more likely to cause damage. It’s consequently justified that they contribute to a more expensive line item. However, we have solutions to make it more affordable and create a better and stronger arrangement! Let’s first go into why decorative trusses are more common than structural ones. Once we discuss those and address them, we will provide the solutions!
Why then are decorative trusses used in great rooms?
There are two primary reasons. The first is that there has been a design of a “truss” or other timber configuration that simply is not a truss and won’t work to hold the roof load. We are sorry to offend anyone, but this is silly. Let’s focus on trusses that are applied to the ceilings of great rooms that can work to hold the load if the construction sequencing is altered a bit. These types of structural timber frame trusses include, King Post Trusses, Queen Post Trusses, and variations in between. Not only are these beautiful, but they are also strong.
We tend to think of great room trusses as part of the interior trim stage.
This is understandable as it’s part of the conventional framed house order of operations. Get the house dried in, roughed in and the wall and ceiling panels up, then install the trim. However, look at our brief overview of the size, scale, and weight of timber trusses. Timber Frame trusses should be part of the framing stage. That’s what they are, structural forms. As builders we tend to get in routines, and it can be hard to deviate from those routines. Unless there is a better plan, which we present at the end of this article.
Protecting trusses from the weather.
The concern over trusses getting rained on during framing stage can be alleviated with proper sequencing. Look at the details we provide towards the end of this article. The key is to have the timber frame trusses fabricated and labeled off site in a controlled environment. When the framers have gotten to the point of building the walls that will hold the trusses, the timbers should be on site. Following the sequencing option, we provide allows the framers to move on to framing a 2x rafters atop the trusses in short order, keeping the trusses from being exposed for a period of time where it could get rained on.
Drywall dust.
This is a hard one to overcome. Drywall mudding and sanding is a messy business. Our suggestion would be to have a wood ceiling atop the trusses. We think it looks better and provides a more classic look. In our details for great room structural timber frame trusses below, we illustrate how this finish ceiling is applied after the building is dried in. If you must go with drywall above your trusses on the ceiling, you should prepare yourself to clean the trusses afterwards.
How to go about adding structural trusses to your great room.
We hope that we provided some valuable information as to why a true load bearing structural timber frame truss in your great room is a superior choice to the fake timber frame truss on the ceiling. It’s not our intent to critique something with such vigor and then not propose a better solution. Therefore, Joint and Peg has provided the following information regarding construction steps to incorporate true timber trusses. That brings us to the construction solutions regarding sequencing and detailing so you can have a more affordable and honest timber frame roof system in your great room. Let’s get into it.
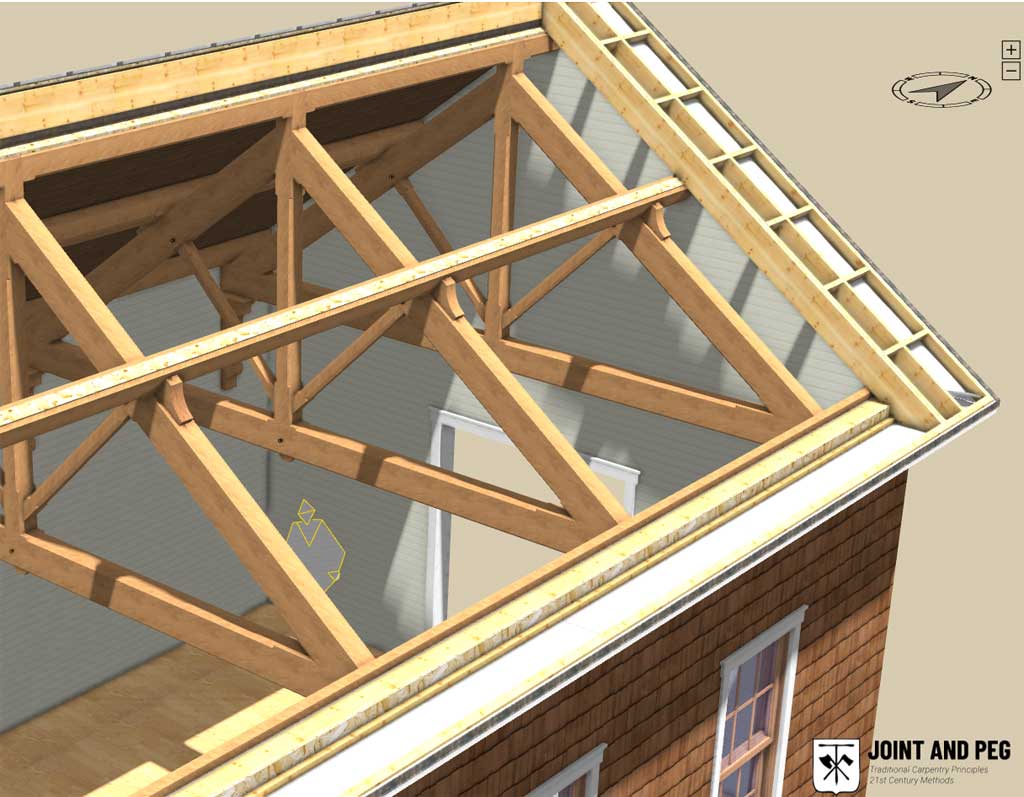
Please refer to one of our designs on the left. This is what we will use as our visual reference as we go through with the solutions described below. It’s a simple structural king post truss roof system with a mid-run purlin. Its classic and beautiful.
If you are interested in other types of timber frame trusses such as parallel chord trusses with iron rods then you should check out our open-air sawmill shed plan.
Timber roof truss installation method
We will use a great room that we have designed as the subject that illustrates the detailing to follow. Although it’s a great room, these same principles can practically be applied to any vaulted insulated building. These beamed great room projects are not as straightforward as open-air timber pavilions. Insulated spaces create more factors that come into play and must be thought through carefully.

Great Room Timber Frame Truss Plan
Use this plan as a guide for learning about how to incorporate timber frame trusses into your great room or other vaulted area of your project. Detailing, explanations, and different enclosure types illustrated.
Process for building an exposed structural truss with a 2x rafter roof.
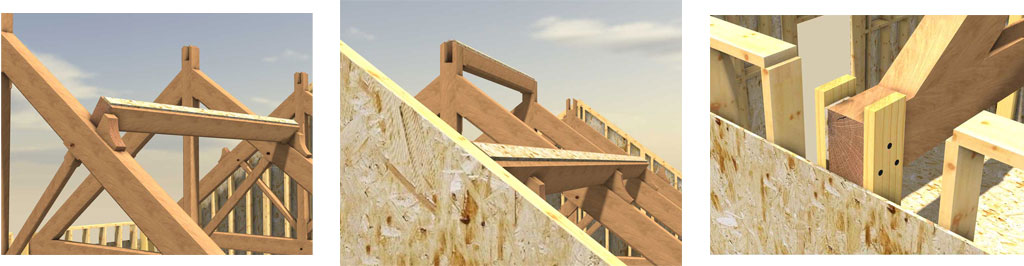
The old saying, “There are many ways to skin a cat” is accurate here. There are many ways to skin a timber truss roof. In this article we are going to concentrate on a 2x hot roof system supported by timber frame trusses with a mid-run purlin. The hot roof system (no venting from eave to ridge) may or not be appropriate depending upon your climate. There are ways to do this with a cold roof too, but that won’t be in the scope of this article.

Essentially we are suggesting a structural timber frame truss roof that sits on a ganged support in a 2x wall. The structural timber frame trusses are set with material lifts during framing. After the trusses, we place the purlins from truss to truss, and ridge timber from truss to truss. Finally, 2x rafters are installed atop the roof the 2x double top plate, timber purlin, and ridge timber. In shorter spans, the mid-run purlin may not be necessary considering your roof loads. In longer spans around 24’ and greater, the mid-run purlin would be prudent. We think it looks fantastic too!
Further Great Room Truss Details and Sequencing
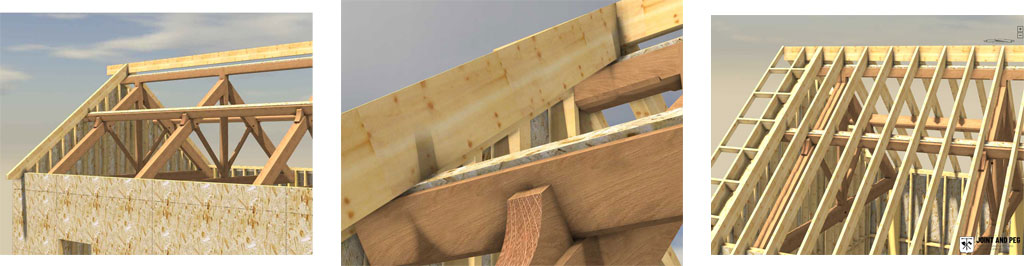
The tops of the timbers have furring strips attached that are 1/8” thicker than your finish ceiling. This allows the trim carpenter to come back and install the tongue and groove ceiling after drying in. Having the framing crew put tongue and groove down throws a wrinkle and large time demand in the process. With our approach they can install those 2x rafters and roof sheathing in short order. Dry in, then do the finish ceiling later.
Thank you for your attention. We’d love to hear your responses. We have more to come on this topic with other favored approaches!
I’m remodeling our vacation house starting next month, and I was thinking of adding timber roof trusses to help improve the aesthetic of the place. I appreciate you informing us that installing timber roof trusses in great rooms requires proper planning and careful thinking regarding insulated spaces. I’ll keep this in mind while I look for a contractor to hire for the installation of timber roof trusses during the remodeling project.
Hi Elina,
We are happy that you have found this information useful. We are going to be adding some different truss designs to this page in the near future. These could be useful to you in furthering along your remodel. Please check back later!