Keeping track of timbers in timber frame construction is important. A good organization system is paramount when it comes to both ordering timbers and organizing cut and completed pieces. When you build a timber frame structure labeling of each timber is vital. This process allows you to keep track of which piece should go where in the frame. There are a few different labeling systems in the timber frame industry and craft. We will explain the reasoning behind these different systems and why timber frame labeling and numbering is integral to success.
Table of contents
Why is labeling important in timber frame construction?
Heavy timbers are not elements that you move freely about. The layout and cutting of all the timbers are typically completed before raising. The timbers are laid out, cut, restacked, and moved about. Without numbering and labeling it would be extremely difficult to keep track.
That is one great benefit of the construction style in that it goes very quickly when on site. That speed on site does not happen accidentally. It is the result of a good system to keep track of all the timbers. The labeling system should be implemented from the start.
A clear labeling system is crucial to this approach. Otherwise, it would not go well once it was time to put the frame together. Keep in mind that stacks of timbers get “shaken out” onto sawhorses and then they are stacked again.
In this article we will first focus on the labeling of timbers during production. Secondly, we will address how to keep manage and keep track of ordering rough length timber. Lastly, we will illustrate how they all work together for an efficient and successful timber frame project.
Labeling for Production
Traditional Marriage Marks
In centuries past (and a handful today) timber framers used their chisels and gouges to create marks on the faces of the timbers. Depending on the area of Europe these marks would look a little different. In general, they were symbolic of the roman numeral system. The marriage mark characters were easy to make with an edge tool such as a chisel or slick.
This was typical of scribing (scribe rule system). These scribed frames were typically concealed by plasterwork or other finishes. The framers did not care that their marriage marks were on visible timber faces. Charmingly, these marriage marks are attractive in that they remind you of the craftsman involved.
Today’s Alpha Numeric System
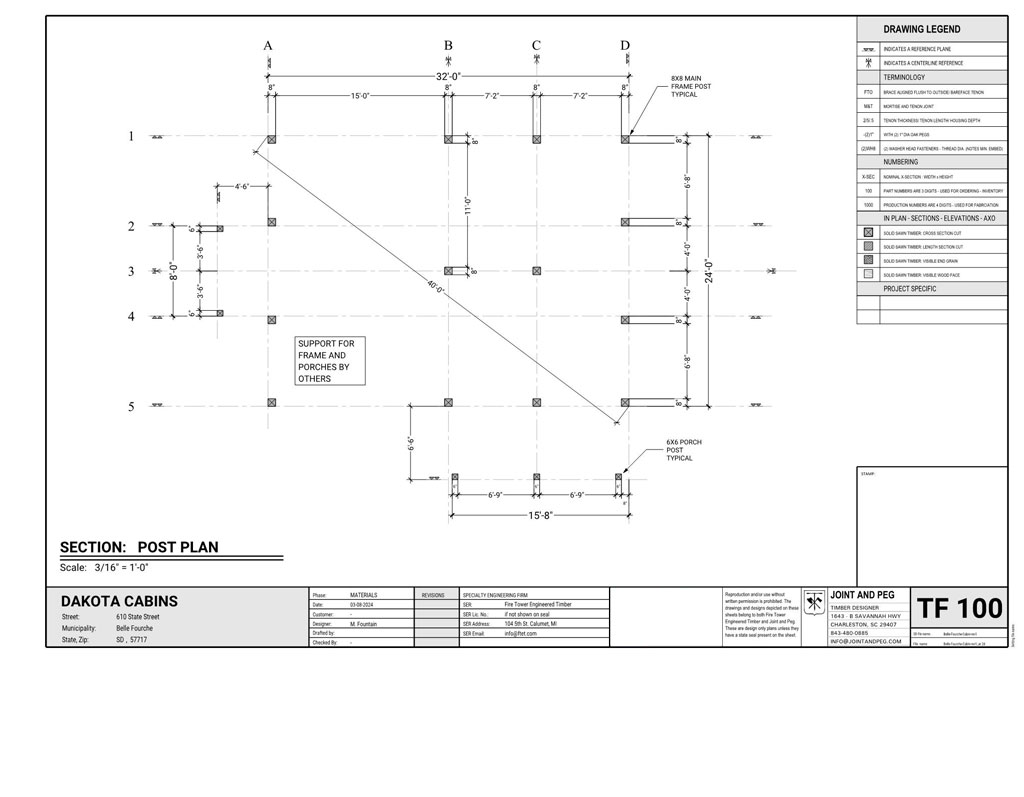
Today timber frame labeling and numbering typically uses an alpha-numeric system based on gridlines of the structure. On a good set of plans there will often be plan views, and sometimes elevations, which show this grid system that relates to the posts. See here one of Joint and Peg’s plans and you will see that the Letter gridlines run in one direction and the numeric gridlines run in the other direction.
These gridlines form the basis of the Alpha-Numeric labeling we are describing.
When to label your timbers
Assign a label to the primary members of your timber frame during the shake out of the material. You will want to look over these timbers and determine where in the frame a particular piece is best suited. For example, if you have a tie beam with sweep, you might want to designate it in the interior of the frame as opposed to an end.
Common members such as joists, common rafters, and common purlins that can be placed anywhere need not require an alpha numeric label. However, if you have many different ones a production number (see later in article) of some sort would be good to use.
Braces are a common member that you would want to not associate a label until after fitting.
Because of the slight variations that will realistically occur when drilling peg holes in mortised pieces, labeling of the knee braces should only be done as soon as fit up has occurred and the assembly has been broken apart. Immediately label the knee brace after you have drilled the tenons.
A quick word on when to drill peg holes in tenons
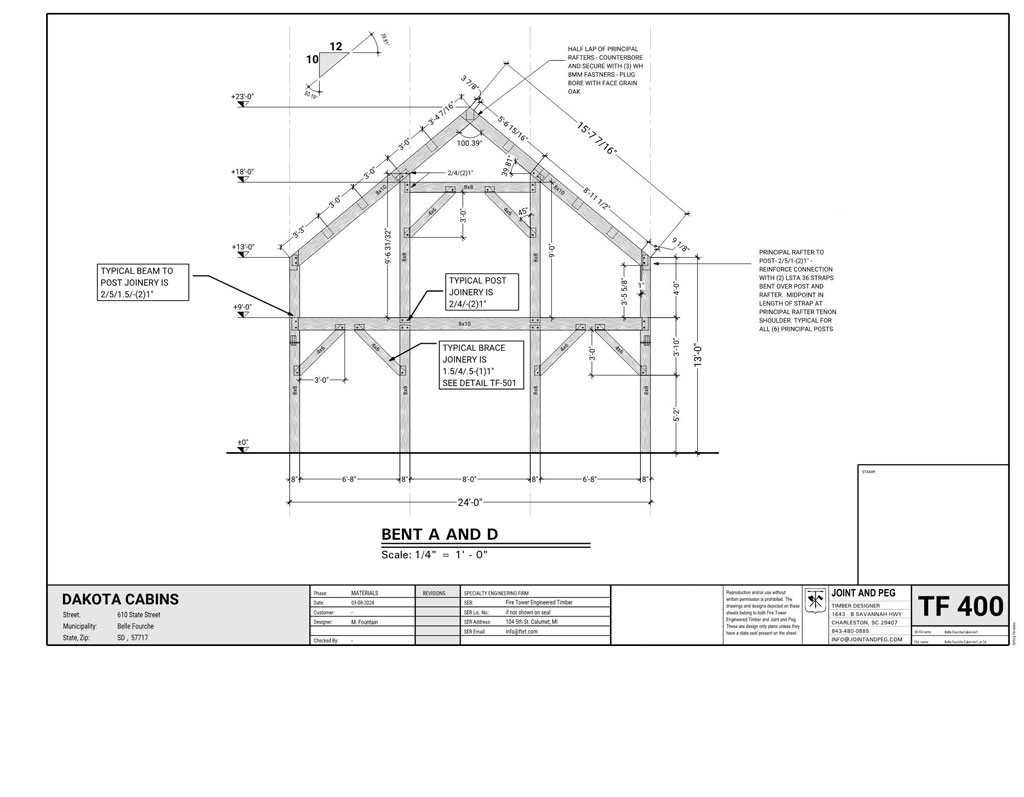
Here at Joint and Peg we recommend that you never drill tenons until you have pre-fit the frames you have built. For an example, let’s look at a Bent in Gridline A. All of mortises will have their peg holes drilled prior to pre-fitting. All of the tenons will not have the peg holes drilled until after, or during, fitting up.
No one is perfect when drilling holes. This method allows for that variance in drilling to occur without negatively affecting the fitment of your work. When you fit up, or preassemble, you use the existing holes drilled in the mortise piece as a guide to mark and drill your holes on your tenon! When you do this, you will produce top of the mark work.
Please see that the Bent in Gridline A has (4) posts and therefore we will see that those gridlines running square to “A” are 1,2,3, and 4. The tiebeam thus lies in Gridline A and runs from gridline 1 to 4 passing through 2 and 3.
How to label your timbers
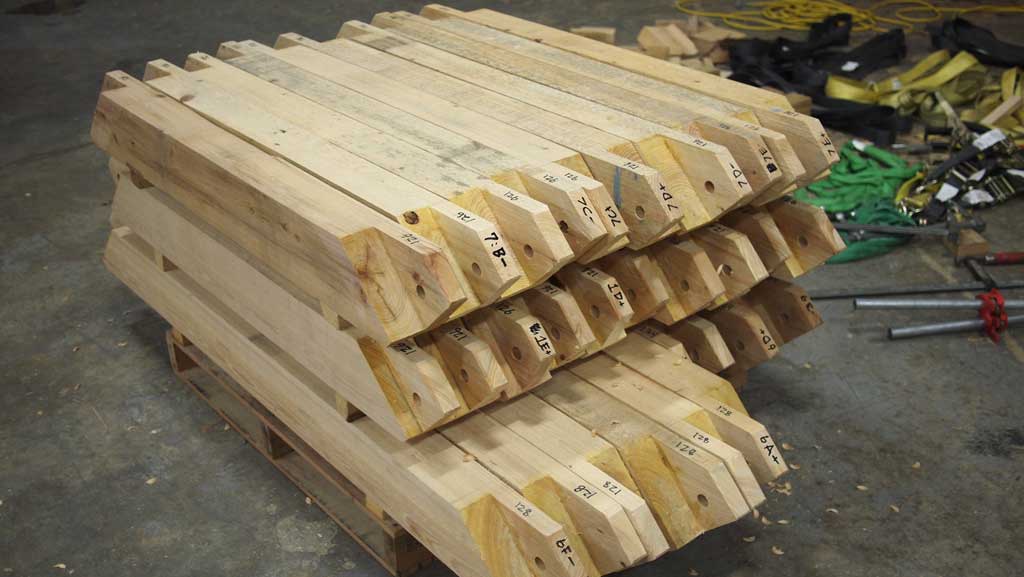
Let us look at our Bent A example again. The way we would label this tie beam is on the end of the tenons where it will not be seen once the frame is constructed. We see no reason not to label both ends. The amount of time to do so makes up for not having to walk around a stack of timbers, to determine the piece and its position.
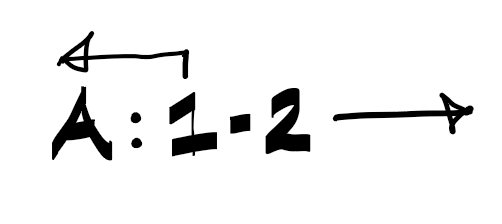
Labeling on the tenon ends.
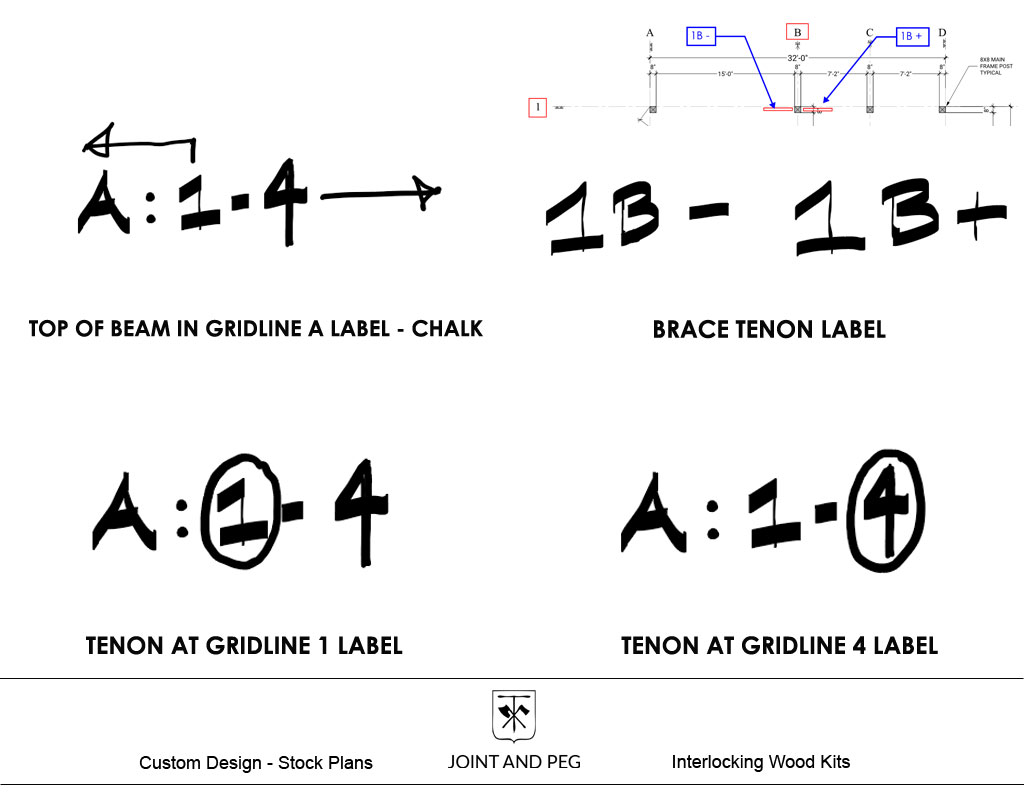
The first letter before the colon signifies which axis the timber lies (parallel). The following characters signify which gridline it meets on its ends. A circle around a number or letter signifies that the tenon end lies in the circled axis.
For braces, you can use a plus or minus symbol to indicate which side of a post the brace should go. In the example, we have two braces in gridline 1 that are at Post B1. The minus brace is closer to A, and the plus brace is closer to C.
Labeling on an unseen face during layout.
During the shop work of laying out and cutting you will want to label with chalk the timber so that you can keep track. Typically, you would want to label it on top of the timber where you would not see it as a preventative measure even though most chalk will go away.
Please note that you do not have tenons to label at this point too. Therefore, this labeling during layout and cutting is necessary.
When we label on top of the timber, we need to use arrows to show which end is which. In the example above we can see that the tie beam in Gridline A runs from Axis 1 to 4.
Production Number System: 4-digit numbers
Sometimes a production number system can be used in addition to the alpha numeric system. These production numbers work well with lists that you could have on a clipboard in the shop or assigned on a set of plans. Although not necessary for tracking cut members, production numbers are very useful when working from stick drawings or cut sheets.
Here at Joint and Peg, we always use 4-digit numbers for production numbers and 3-digit numbers for parts numbers. Parts numbers are for ordering and inventory, and production numbers are for fabrication. We will address parts numbers in detail later in this article but for now it is important to understand this distinction.
Parts numbers address rough stock lengths that you will need to order, and production numbers address a specific cut piece that comes from the part.
Labeling for Ordering and Inventory
We recommend using a numeric system for both keeping track of what timbers you need to order and what pieces will eventually come from those rough stock lengths.
Here at Joint and Peg, we always provide a parts list, or timber list, with all our plans. These part numbers are 3-digit numbers.
Identical parts numbers are assigned to members that require the same rough stock length when ordering but not the same actual length when cut during fabrication. For example, if you have a piece that is 8’9” and another that is 9’2” you would order a 10-footer for each.
These two timbers would have the same part number but NOT the same production number. We round up lengths to order stock lengths as follows:
All timbers 8’ and less in length will be rounded to the nearest foot. The reasoning behind this is that you can order (1) 14-footer if you have (2) 7-foot rough lengths.
All timbers more than 8’ in length will be rounded to the nearest even foot.
Incorporating the systems with your project.
This is a lot to process so let us look at an example of how this would all work chronologically. We will be using our 24×32 Timber Frame Carport Plan to illustrate.
If you have created your own design, you will need to do a takeoff and determine what rough length timbers you need to order. If you have purchased a plan set from us, we have done this for you already. See below. You will notice that this list has the part numbers associated with the timbers as well as the names of those timbers.
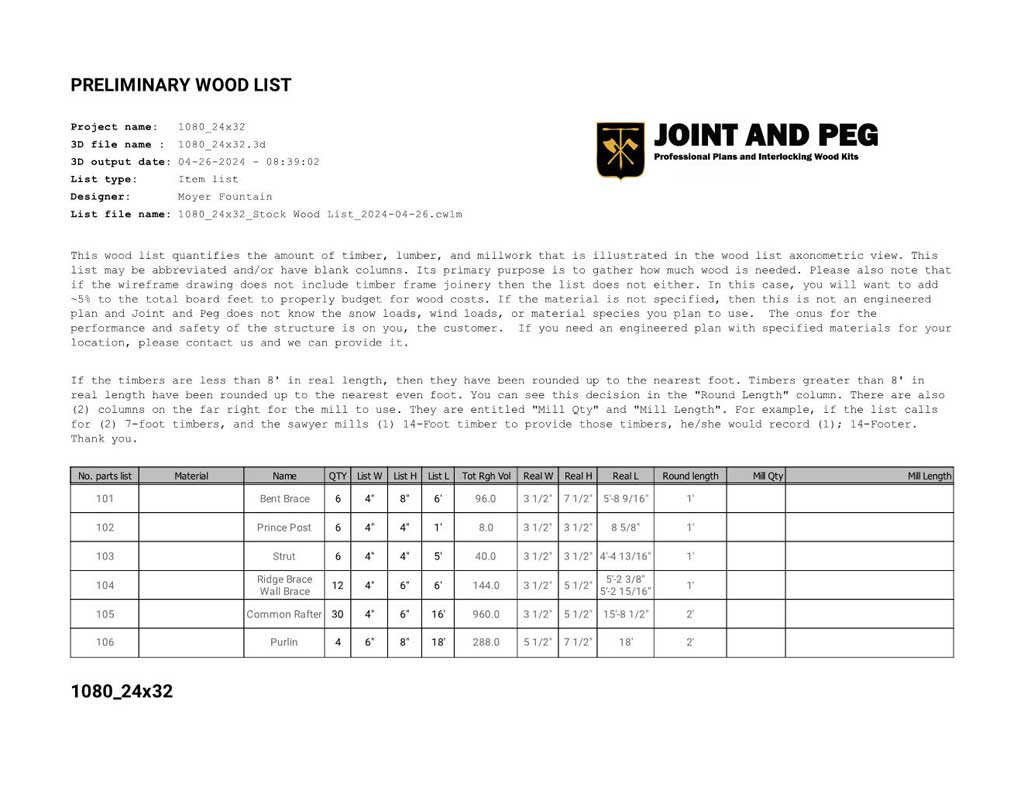
Parts List Numbering Axonometric View
This list serves as a list you can provide for a supplier or sawyer and as an inventory list for getting your production ready.
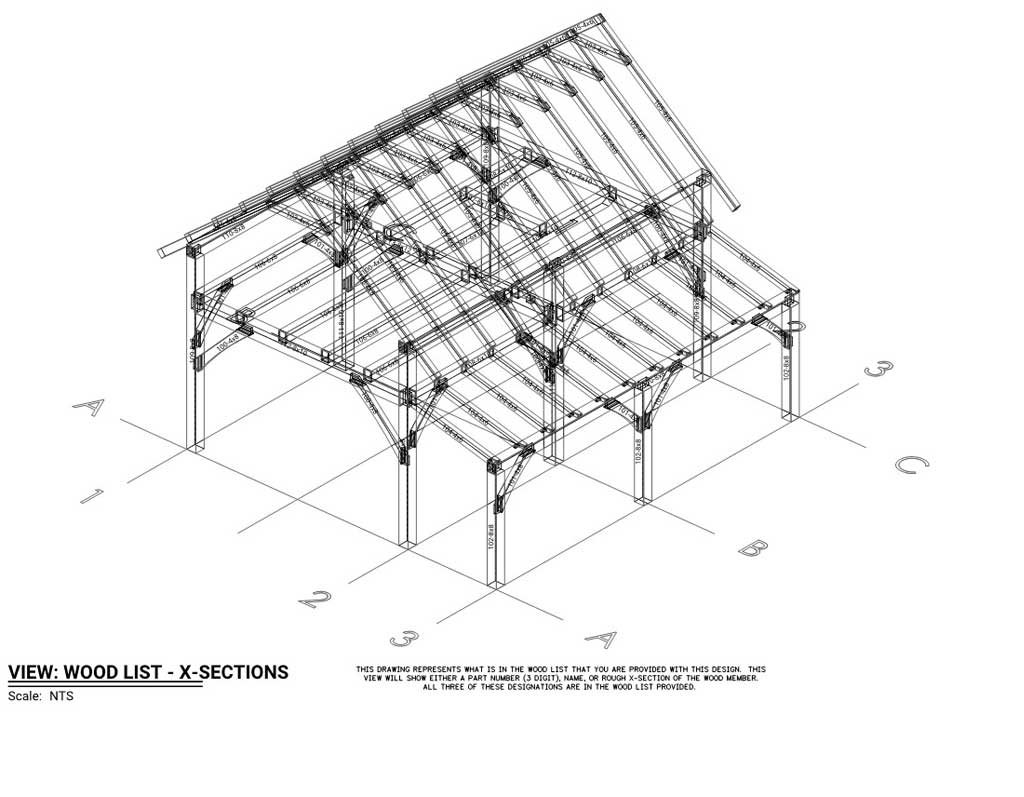
Joint and Peg plans also provide an axonometric view of the timber frame structure with all the parts numbers so that you can see where they are in the frame too.
Now that you have ordered the timber and you have it all in stacks ready to be cut, you can either proceed with the work while assigning alpha-numeric labeling as described above.
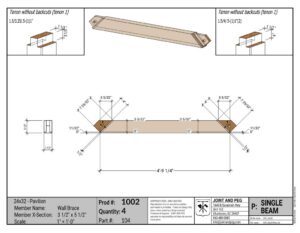
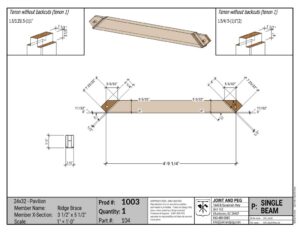
Shop Drawings with Production Numbers
Please note the following If you have purchased shop drawings from Joint and Peg. The cut sheets have the part number of the rough stock, the production number of the piece to be cut, and its quantity of identical members. These two different braces come from the same rough stock length, or part number. However, they have different production numbers because they are not identical pieces.
Conclusion
We hope we have had your attention for this article. Now you can understand the importance of timber frame labeling and numbering. With the information provided you should have confidence in moving forward. Keep good track of your work through your timber frame project!
If any part is unclear, please leave us a message in the comments below and we will answer.